

Ubuntu at CSE
This page provides information useful if you are running Ubuntu at CSE.Installation Media
The easiest way to obtain Ubuntu is to download it from the CSE Mirror and create a bootable USB from the disc image.For installation, we recommend that you peruse the official installation guide, which can be found at http://help.ubuntu.com/ and in their wiki.
Installation Guidance
The following is based on the installation from an Ubuntu Dapper (6.06) installation CD. The target machine was connected to the CSE Untrusted Network and our network servers were configured to provide it with a DHCP lease.- Make sure the machine is connected to the network then switch it on and boot it from the Ubuntu 6.06 CD.
- Installation will ask some questions about language, time zone and other locale information. Select the options you require.
- The harddisk will be partitioned for the new installation. I made a new partition and did not save the previous partition. If you wish to keep an existing partition (such as Windows) and use both the new and the old then you will need to partition and configure Ubuntu differently. Read this link for a guide.
- Select the initial account and password. This account will not have superuser (root) access but the password chosen for this account will be used to run commands as root with the sudo command. We strongly suggest that you choose your CSE username for this account. This will make things a lot easier later on. Please choose a long password containing numbers and punctuation. A weak root password will leave your machine vulnerable to compromise.
- ... More installation actions occur then you remove the CD and reboot the machine.
- The machine boots into the new installation and sets up the base system.
- Once this is done log in using the account you created during installation
- Log out (using System menu, Quit and then Log Out and then login again using the new account.
- Set the Network proxy settings again using the method described above. If you skip this step, then the package updates will not work.
- Open a terminal program. (Click on Applications at the top left then Accessories and then Terminal)
- To configure access to various CSE services look at the section Accessing CSE Services from within CSE at RunningYourComputer.
sudo apt-get update
sudo apt-get --fix-missing upgrade
(You could also use Ubuntu's Graphical Package Manager instead of the last two steps to update the package list)
Accessing your home directory
The instructions below are specifically for computers connected to the CSE network.Viewing your home directory in Nautilus
To view the contents of your home directory, you can connect to the server using the Nautilus File Browser. Click the Places menu and select Connect to Server. Use the following picture to help with the information required in the dialog box that appears.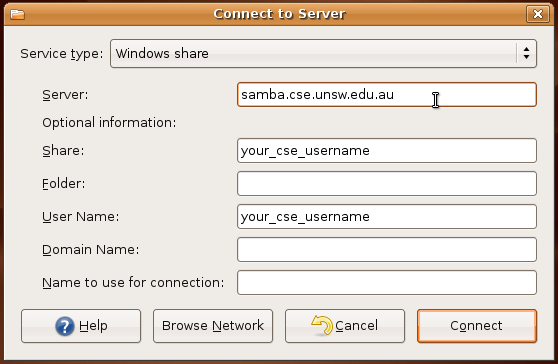 After clicking OK, a folder should appear on your desktop. Double click the folder, and enter your CSE password into the dialog box. Don't worry about changing the workgroup. Your home folder should be displayed in a Nautilus window.
Installing the SMB file system
You will probably want to mount your CSE home directory. The Nautilus file browser will let you see the contents of your home directory, but if you want to mount this drive for easier access, you must install the SMB file system. You can do this from a Terminal prompt by typingsudo apt-get install smbfs